Wednesday 1 April 2015

HOW TO MONITOR YOUR DEVELOPMENT PIPELINE WITH BUILDREACTOR CHROME EXTENSION

Nowadays there is an extension for everything.

BuildReactor provides a nice GUI to monitor your development pipeline with one click.

Just install the extension from the Google market place:


And configure it providing your CI details; In this case I am using Jenkins:


Save your profile and you will be able to access your build system directly from your browser:


Many other CIs are supported:


Luca !

Wednesday 25 March 2015

WHITE-BOX APPLICATION MONITORING WITH DOCKER AND BOSUN - AT HOME !

In my previous post I have shown you how to perform black box monitoring of your web application. 
Today I am going to show you how to perform white box monitoring using BosunBosun is an advanced, open-source monitoring and alerting created by Stack Exchange. We are going to use it to perform some white box monitoring on our car service application I used in my the previous post.First thing to do is to start that docker image again and starting Jboss if not already running :


/opt/wildfly/bin/standalone.sh -c standalone-full.xml -b 0.0.0.0

Now we can pull the docker image from docker hub with the following command:

docker pull stackexchange/bosun

Once this image has been downloaded we can run it with:

docker run -d -p 4242:4242 -p 8070:8070 stackexchange/bosun

Bosun should now be accessible in your browser at 192.168.59.103:8070 where 192.168.59.103 is the Boot2Docker host Ip address.


Let’s go one second back to our web application Docker container. Here we have to download the Bosun collector and start it:


./scollector-linux-amd64 -h 192.168.59.103:8070 (where 192.168.59.103 is the Ip Address of the Bosun machine)

You may have to first make the collector executable with:

chmod +x scollector-linux-amd64 

The collector was giving some problem for me so I had to install postfix first with:

apt-get install postfix

Now your www docker container is sending data to the Bosun docker container.

Let’s check the Bosun graphical interface in the browser.

Go at http://192.168.59.103:8070/ again and chose your www docker container from the “hosts” tab:  


This data is being collected and aggregate by Bosun.


You can see CPU, memory, network and disk space usage.
There are many other functionality. Let’s explore the expression tab. 

In this tab you can write an expression for keeping under control a specific metric of your interest.

I wrote an expression for checking that the average CPU load in the last 5 minutes did not go above a threshold of 80%.
In the tab result you can see that this expression has not been satisfied which means that in the last 5 minutes, the average CPU rate, never went over 80%.

A specific metric can also be selected in the Available metric tab:


Here I selected the metric “linux.loadavg_1_min"


Also for this metric I have set a threshold of 80% which has not been reached in the last minute so under the tab normals you can read 1 as shown in the following image:


If I set the threshold  to be 0, we can see that one Critical is triggered. When this situation happen an email will be sent. The template of the email can be totally personalised as can be seen in the image above.  

Finally I executed some load test against the web application with:


It is clear from the image below that the average-load started very low because there was no processing on the web application in the www docker image. The very first peak is a first execution of the load test. Then I waited 30 second so the average load went down again, to finally go up again when I executed the test again. 


Saturday 14 March 2015

BLACK BOX APPLICATION MONITORING WITH NAGIOS AND DOCKER - AT HOME !

This guide assumes you have a working installation of Docker!

This blog post will show how to monitor a web service running in a Docker container using black box monitoring techniques with Nagios.


Monitoring is:

Examining your software in the act of running in production;
Looking for error conditions and recording data for trending purposes;
Being able to correlate events for troubleshooting;
Alerting and possibly recovering when things go wrong.

The very final goal of monitoring application service is to lower your MTTDetect, MTTDiagnose, MTTTRepair where MTT == Mean Time To.

There are two kind of monitoring techniques: black box and white box.

Black box techniques take in consideration the global state os the service as a whole. 

Black-box is:

Simulated queries.
Verifies end-to-end operation.
You really don’t have anything except the input and output. 
Important to monitor all sets of dependencies. e.g. DNS. "Single points of failure." 

White-box is:
Monitoring where you know about the inside of the app. 
You may have access to the source or other instrumentation 
You can evaluate metrics derived from instrumentation.

In this post we'll recreate a production environment using three docker virtual machines.
The first virtual machine, we are going to call www, will contain a car service web application. Technically speaking this is a docker container running Jboss with a Car Service web application deployed in it.
The first step is to pull this virtual machine from docker hub:

docker pull jwasilewski/lab4-www

and run it with:

docker run -i -t --name www -p 8080:8080 jwasilewski/lab4-www /bin/bash

And starting Jboss:

/opt/wildfly/bin/standalone.sh -c standalone-full.xml -b 0.0.0.0

We can get the ip address of boot2docker (is you are running Docker on a Mac like me) with the following command:

boot2docker ip

Which returns on my machine:

192.168.59.103

If we open the browser at 192.168.59.103:8080 we should now see the web application up and running: 


The second step will be to pull a Nagios docker container from docker hub with:

docker pull cpuguy83/nags

Nagios is an open source computer system monitoring, network monitoring and infrastructure monitoring software application. Nagios offers monitoring and alerting services for servers, switches, applications, and services. It alerts the users when things go wrong and alerts them a second time when the problem has been resolved.
In starting this docker container, we want to link it with our web-application because they will need to continuously communicate with each other:

sudo docker run -i -t  --name nagios -p 80:80 --link www:www cpuguy83/nagios /bin/bash

The username and password for the Nagios Docker images are:

username = nagiosadmin
password = nagios

Let’s make sure that the Nagios container can communicate with the web application docker container (www), trying to ping the latter from the Nagios container shell: 


Let’s also make sure that the Nagios docker container can directly contact the Jboss web application with a simple wget;
The index.html page only represent the WildFly landing page:


It is now time to create a couple of checks in the Nagios container.
In the folder objects, let’s create a new file called www.cfg. This file will contain our nagios check:


cd /opt/nagios/etc/objects

vi www.cfg


So now we have to tell Nagios that there is a new configuration file to read; We have to edit the file /opt/nagios/etc/nagios.cfg: 


We can finally start Nagios:

/usr/local/bin/start_nagios


We should now be able to see Nagios user interface at http://192.168.59.103:80, where 192.168.59.103 is the Boot2Docker host Ip address: 


The image below is a snapshot of the “Hosts” Nagios page, that shows that localhost and www (which is our web Docker Container) are both up at moment. This is a “ping” check ! 

The next images is a snapshot of the “Services” page that shows that we are monitoring the Jboss service inside the “www” docker container.
 This is a Http Check on the port 8080 which is the port where Jboss is currently running: 


Then we go back to our “www” virtual machine and we shutdown Jboss. Nagios, in the next check iteration, will show Jboss down as shown in the image below:


Many other checks can be performed using Nagios.
Some of them are listed here. 

Monday 9 March 2015

@QConLondon - To the moon - Russ Olsen

First talk at QConLondon was also the best.
Russ Olsen author of "Eloquent Ruby" and vice-president at Cognitect, literally brought us to the moon with is talk.

"We all have moments that change the way we think, the way we look at the world, the things we want to do with our lives. On July 20, 1969 millions of people had one of those transforming experiences: Two men landed on the Moon and nothing was ever the same again. Why did we go to the Moon? How did we get there? What was it like to witness it all? And what does any of this have to do with writing software 40 years later?"

Check out the talk on you tube at: To the moon.

It was so good that I wanted to remember this moment:


Thanks Russ !


Friday 6 March 2015

Tuesday 3 March 2015

@QCONLONDON - DAY 1

Very excited to take part to QCon London tomorrow !

This is my personal schedule:


Read is good, yellow is great !
It is going to be a long day but well worth !

Stay QCon
Luca

Tuesday 27 January 2015

DESIGN PATTERN BY EXAMPLE (IN RUBY) - THE DECORATOR PATTERN

In my previous article, I have shown you a practical application of the State Pattern in Ruby.

Today problem regards drinks; In particular our loved coffee will be at center of our attention.

We have two Coffee classes, Decaf and Espresso. Two types of Condiments can be added to the coffee, Milk and Sugar.


 class Decaf  
  def description  
   "decaffinated coffee"  
  end  
  def cost  
   2.0  
  end  
 end  
 class Espresso  
  def description  
   "expresso coffee"  
  end  
  def cost  
   1.5  
  end  
 end  
 class Milk  
  def description  
   "milk"  
  end  
  def cost  
   0.50  
  end  
 end  
 class Sugar  
  def description  
   "sugar"  
  end  
  def cost  
   0.20  
  end  
 end  


The class DecafWithMilkAndSugar has been created for making a Decaf with Milk and Sugar as the name says.


 class DecafWithMilkAndSugar  
  def initialize  
   @coffee = Decaf.new  
   @milk = Milk.new  
   @sugar = Sugar.new  
  end  
  def description  
   "#{@coffee.description} #{@milk.description} #{@sugar.description}"   
  end  
  def cost  
   @coffee.cost + @milk.cost + @sugar.cost   
  end  
 end  
 my_coffee = DecafWithMilkAndSugar.new  
 puts "My coffee is:"  
 puts my_coffee.description  
 puts "and costs:"  
 puts my_coffee.cost  

And we are happy it works:


 My coffee is:  
 decaffinated coffee milk sugar  
 and costs:  
 2.7  


However we are concerned at the 5 other combination classes you still have to write. We also hear that more Coffee types are on the way (DarkRoast and HouseBlend) and further condiments are possible (Syrup, Sweetener, Soy). This kind of code obviously is not capable to accommodate this new requirements in any elegant way. In fact we would have to create an exponential number of classes for all the possible combination of coffees and condiments.In this scenario we can refactor this code to apply the Decorator pattern;The decorator pattern can be used to extend (decorate) the functionality of a certain object statically, or in some cases at run-time, independently of other instances of the same class, provided some groundwork is done at design time. This is achieved by designing a new decorator class that wraps the original class. This wrapping could be achieved by the following sequence of steps:

  • Subclass the original "Component" class into a "Decorator" class (see UML diagram);
  • In the Decorator class, add a Component pointer as a field;
  • Pass a Component to the Decorator constructor to initialize the Component pointer;
  • In the Decorator class, redirect all "Component" methods to the "Component" pointer; 
  • In the ConcreteDecorator class, override any Component method(s) whose behavior needs to be modified.

This is the typical class diagram structure for an application using the decorator pattern:


So let's implement this pattern in our application.
We start from the main component which is the class Coffee:

 class Coffee  
  def description  
   puts "abstract method"  
  end  
  def cost  
   puts "abstract method"  
  end  
 end  

This would be an abstract class, but as we know there is not such concept in Ruby, so we just implement the methods of this class with a default behavior.

As the original description of the problem states, we have two types of coffees, Decaf and Espresso. Let's create two classes for modelling these entities:

 class Decaf < Coffee  
  def description  
   "decaffinated coffee"  
  end  
  def cost  
   2.0  
  end  
 end  
 class Espresso < Coffee  
  def description  
   "expresso coffee"  
  end  
  def cost  
   1.5  
  end  
 end  


Both classes extend the parent class Coffee and override its method with a concrete and specific implementation.

Let's now talk about the decorator class. We are going to call this class CoffeeDecorator and make it extend Coffee:

 require_relative 'coffee.rb'  
 class CoffeeDecorator < Coffee  
  attr_reader :coffee  
  def initialize(coffee)  
   @coffee = coffee  
  end  
  def description  
   @coffee.description + " | "  
  end  
  def cost  
   @coffee.cost  
  end  
 end  

Now we need two more classes for the condiment, milk and sugar, that extend the decorator class:

 require_relative 'coffee.rb'  
 class Milk < CoffeeDecorator  
  def initialize(coffee)  
   super(coffee)  
  end  
  def description  
   super + " with milk"  
  end  
  def cost  
   super + 0.50  
  end  
 end  
 class Sugar < CoffeeDecorator  
  def initialize(coffee)  
   super(coffee)  
  end  
  def description  
   super + " with sugar"  
  end  
  def cost  
   super + 0.20  
  end  
 end  

You can see that all these three classes take a coffee as a constructor argument and define new behaviour for the methods they implement. This is the mechanism we are going to use for decorating each coffee. The main application now can create any kind of coffee with any condiment, simply chaining the constructors:

 require_relative 'coffee.rb'  
 require_relative 'coffee_decorator.rb'  
 coffeeWithMilkAndSugar = Milk.new(Sugar.new(Decaf.new))  
 puts "My coffee is:"  
 puts coffeeWithMilkAndSugar.description  
 puts "and costs:"
 puts coffeeWithMilkAndSugar.cost

This will still print something like this:

 My coffee is:  
 decaffinated coffee | with sugar | with milk  
 and costs:  
 2.7  

You can the code became extremely flexible. Any coffee composed by any combination of condiments can be created in the same way. What if the bar wants to make a new promotion and offer some RandomCoffee ? Here the code:


And here the output:

 require_relative 'coffee.rb'  
 require_relative 'coffee_decorator.rb'  
 class RandomCoffee  
  def initialize  
   num = Kernel.rand(1..4)  
   if num == 1  
    @coffee = Milk.new(Sugar.new(Decaf.new))  
   end  
   if num == 2  
    @coffee = Sugar.new(Milk.new(Decaf.new))  
   end  
   if num == 3  
    @coffee = Sugar.new(Espresso.new)  
   end  
   if num == 4  
    @coffee = Sugar.new(Milk.new(Espresso.new))  
   end  
  end  
  def description  
   @coffee.description  
  end  
  def cost  
   @coffee.cost  
  end  
 end  
 randomCoffee = RandomCoffee.new  
 puts "My coffee is:"  
 puts randomCoffee.description  
 puts "and costs:"  
 puts randomCoffee.cost  

And here a  possible output:

 My coffee is:  
 decaffinated coffee | with milk | with sugar  
 and costs:  
 2.7  


The latest piece show how is to decorate a coffee now.

The full class diagram for the application is reported below:


HAPPY CODING!

LUCA

Tuesday 20 January 2015

SPRING SESSION 1.0 HAS BEEN RELEASED

Pivotal finally release Spring Session 1.0.

Spring Session replaces theHttpSession(tomcat implementation for example) with an implementation that is backed by Redis. 

A full guide can be found at Spring Session Release

Luca

Tuesday 13 January 2015

DESIGN PATTERN BY EXAMPLE (IN RUBY) - THE STATE PATTERN

In my previous posts I've shown you an application of the Abstract Factory and the Singleton pattern.

In this post we are going to explore the State design pattern.

A typical scenario where the State design pattern is particularly helpful is when an object of our application needs to behave differently on the basis of its State.

In our example, the Person class defines three methods. Each of this methods will run some logic that is specific to the person state.

Here is the code for this example:


 class Person   
      def initialize   
           @age = 0  
           @state = :CHILD  
      end  
      def incr_age  
           @age+=1;  
           if (@age==18)  
                @state = :ADULT  
           end  
           if (@age==65)  
                @state = :PENSIONER  
           end  
      end  
      def vote()  
           if @state==:CHILD  
                puts "Too young to vote"  
           else  
                puts "Vote accepted"  
           end  
      end  
      def apply_for_buspass  
           if (@state==:PENSIONER)  
                puts "Pass granted"  
           else  
                puts "Too young for a bus pass"  
           end  
      end  
      def conscript  
           case @state  
            when :PENSIONER: puts "Too old to be conscripted"  
            when :CHILD: puts "Too young to be conscripted"  
            when :ADULT: puts "Here's your gun"  
       end  
  end  
 end  

Every time a method of the Person class is called, a status check is made.

This code is very convoluted. Adding more states means adding more "if" statements in every single method. Adding new behavior means implement a new "case" statement.
The nature of this problem, suggest the use of the State pattern.

The state pattern, which closely resembles Strategy Pattern, is a behavioral software design pattern, also known as the objects for states pattern. This pattern is used to encapsulate varying behavior for the same routine based on an object's state object. This can be a cleaner way for an object to change its behavior at runtime without resorting to large monolithic conditional statements

The first step is to create a class for each State a Person can acquire. 

We also create a superclass called State which could hold common behavior to all the states:


 class State  
  def vote  
   raise 'this method should be implemented in a concrete subclass'  
  end  
  def apply_for_buspass  
   raise 'this method should be implemented in a concrete subclass'  
  end  
  def conscript  
   raise 'this method should be implemented in a concrete subclass'  
  end  
  def apply_for_medical_card  
   raise 'this method should be implemented in a concrete subclass'  
  end  
 end  

I will show you only the state class for the ChildState:


 require_relative 'state.rb'  
 class ChildState < State  
  @@instance = ChildState.new  
  private_class_method :new  
  def self.instance  
   return @@instance  
  end  
  def vote  
    puts "Too young to vote"  
  end  
  def apply_for_buspass  
    puts "Too young for a bus pass"  
  end  
  def conscript  
     puts "Too young to be conscripted"  
  end  
  def apply_for_medical_card  
   puts 'qualified for medical card'  
  end  
 end  


The other one's will be very similar to this one but they will implement specific behavior based on the specific state.

If you read my post on the Singleton pattern, I am sure you recognized that I am also using the Singleton pattern in this example. The reason behind this decision is that we do not need to create a state object for each Person object we create. 
States this application is modelling at moment, are three by design, so we need to create only three states instances globally. Using the Singleton Pattern here, will insure that when we create a new State, only a single instance will be created and eventually retrieved. 
States in this application are stateless. 

It can also be useful to have an utility class that returns a specific state for a Person when an age is passed in. I will call this class AgeStateContext:
 require_relative 'adult_state.rb'  
 require_relative 'child_state.rb'  
 require_relative 'pensioner_state.rb'  
 require_relative 'teenager_state.rb'  
 class AgeStateContext  
  def AgeStateContext.state(age)  
   if (age>65)  
    return PensionerState.instance  
   end  
   if (age>18)  
    AdultState.instance  
   end  
   if (age>15)  
    TeenagerState.instance  
   end  
   return ChildState.instance  
  end  
 end  

Now the person class doesn't need to keep its state anymore.

It can just ask this utility class, which will answer with the state based on its age.
This is the new Person class


 require_relative 'age_state_context.rb'  
 require_relative 'state.rb'  
 class Person  
  def initialize  
   @age = 0  
  end  
  def incr_age  
   @age+=1  
  end  
  def vote()  
   AgeStateContext.state(@age).vote  
  end  
  def apply_for_buspass  
   AgeStateContext.state(@age).apply_for_buspass  
  end  
  def conscript  
   AgeStateContext.state(@age).conscript  
  end  
  def apply_for_medical_card  
   AgeStateContext.state(@age).apply_for_medical_card  
  end  
 end  

It looks much simpler and readable.
we can surely import the AgeStateContext class statically and avoid to name it every time we need to call the state(@age) method.

We create a simple main for exercising this application:


 p = Person.new  
 for i in 1..80  
  p.incr_age();  
  p.apply_for_buspass();  
  p.vote();  
  p.conscript();  
  p.apply_for_medical_card();  
 end  

This is the class diagram for this application:


HAPPY CODING !

LUCA

Monday 5 January 2015

SPRING 3.2 CORE PROFESSIONAL CERTIFICATION EXPERIENCE - INSIGHTS AND AMBIGUOS QUESTIONS

Hi everybody and welcome back!

In the wake of the post on the JAVA SE 7 PROFESSIONAL CERTIFICATION, today I want to tell you about my experience with the Spring Core 3.2 Professional Certification.

I found this certification extremely interesting first because the topics treated have a great impact on my day by day job and last, for the amount of new things I learnt about this framework.
So let's get started !!


WHY TO GET A SPRING CERTIFICATION


This should be your first question. I asked this question myself when I got my first certification, the OCAJA7 - AKA 1z0-803. The answer is included in the following points:


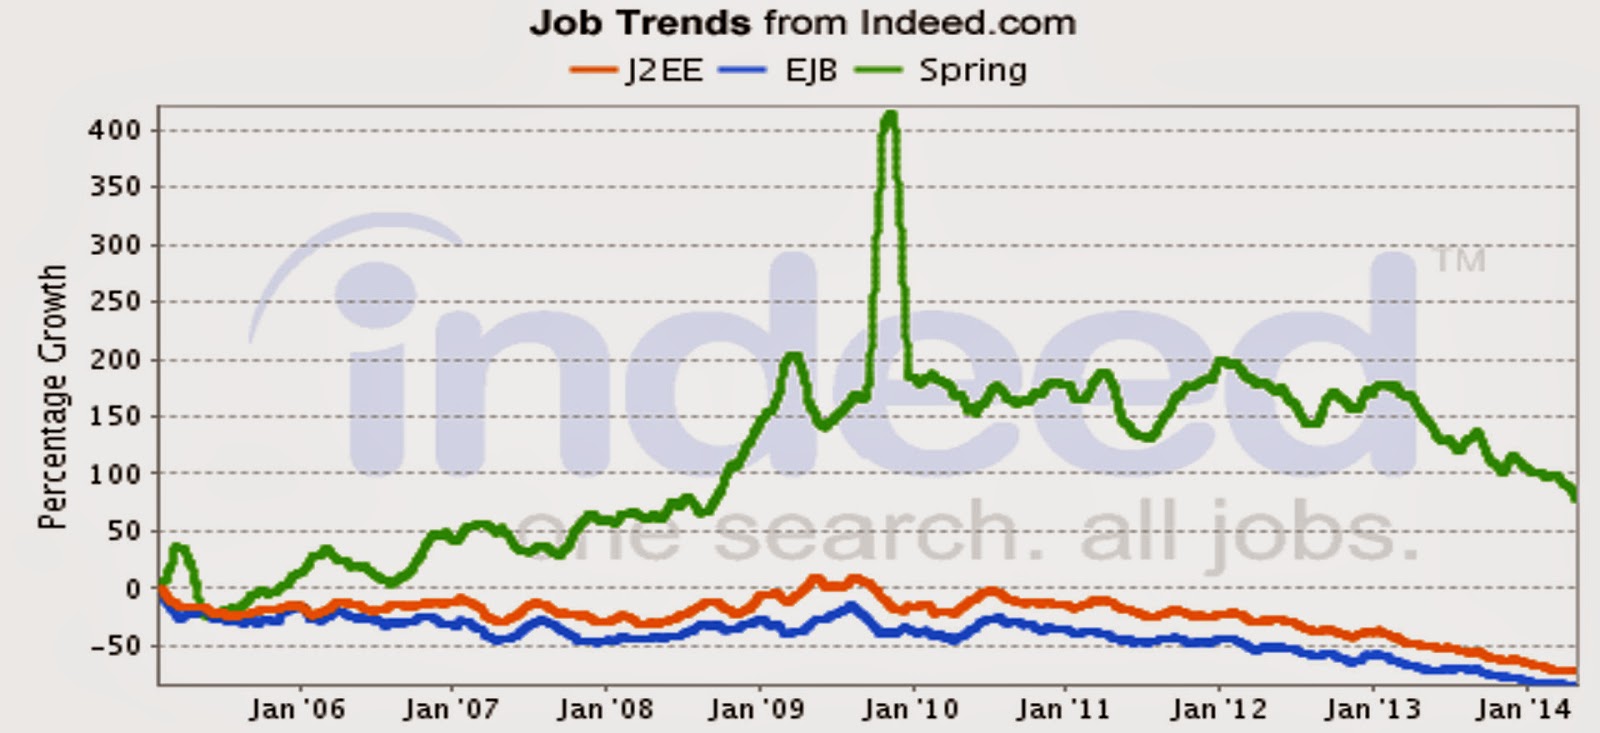
  • The first and probably most important reason is that the market demand for Spring developers is just exploding. I haven't seen one job description for back-end developers or engineers, not mentioning the word Spring. This picture shows the job trend for our industry:
  • Source indeed.com
  • Getting the certification can or cannot help to learn the technology so it will not be enough to pass an interview. On the other side it will help you at least to get that job interview;
  • This certification is actually a serious one. It is not easy to pass, it is very broad covering several topics and some questions can be tricky. This gives much more value to the certification itself and to the certificate you will stick on your CV;
  • You will be entitled to use the Spring logo on your cv after you get certificate;
  • It has always been funny for me to test myself!
  
THE CERTIFICATION PATH


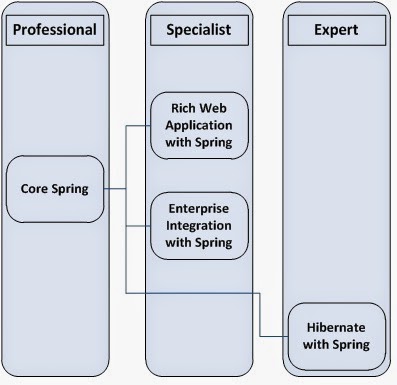
Like for Java certifications, also for Spring there is a kind of certification path. The difference is that no certification is a prerequisite for another one. You can take them in whichever order you prefer. I would strongly suggest to go for the Spring Core first as many of the topics treaded on the other certifications, rely on this knowledge anyway.


Source http://www.javacodebook.com/

In this post, I will only tell you about the Core Spring Professional certification. If I will ever have time, I might think to prepare posts also the other ones.


PREREQUISITES : SPRING COURSE


Unlike the Java Certification, you cannot take the Spring Core Professional Certification exam if you haven't taken part to a Spring Core Course before.
This courses are run by a company called "Pivotal" which seems to be under VmWare umbrella.
You can book your course here: http://mylearn.vmware.com/SpringCore.
The course will touch all the topics listed below:

1. INTRODUCTION TO SPRING

2. SPRING JAVA CONFIGURATION: A DEEPER
 LOOK

3. ANNOTATION-BASED DEPENDENCY
 INJECTION

4. XML DEPENDENCY INJECTION

5. THE BEAN LIFECYCLE: HOW DOES SPRING WORK INTERNALLY?

6. TESTING A SPRING-BASED APPLICATION

7. ASPECT-ORIENTED PROGRAMMING

8. DATA ACCESS AND JDBC WITH SPRING

9. DATABASE TRANSACTIONS WITH SPRING

10. INTEGRATING SPRING WITH JPA AND HIBERNATE

11. SPRING IN A WEB APPLICATION

12. SPRING SECURITY

13. ADVANCED TOPICS

For a full breakdown of each of these topic you can take a look to this course guide in pdf.

When you take the course, you will be given a quite big study guide that contains all the topic treated.
You can see in the following image on the left.


The usb in the right picture, contains all the labs that will be done through the course. You can see an overview on the image below. Please, go trough them ! You can take your notes on the Student Notebook!


Our instructor was Russ Miles. He is extremely passionate about technology and a great public speaker as well. Its Linkedin profile can be consulted here. He is also co-author of the book "Head first software development":


Head first software development


EXAMS TOPICS 

The list of topics is fully available in the certification guide published by Pivotal here. In short you will have to deal with:

  • Container -basics 
  • AOP
  • Data Access and transactions
  • Spring MVC
  • Remoting
  • Security
  • JMS
  • JMX 

PRICE

This certification is free or better you will get a free voucher on your email when you finish your Spring course. The voucher will expire after 9 months from the date of receipt. If you fail the exam, you can buy an exam retake voucher. It will cost 150 US dollars (or locally priced).


 QUESTIONS AND TIME

This exam contains 50 question. You should be given 90 minutes. However I am not sure why I' ve got only 88 minutes. Even on the mock exams I have taken at springmockexams.com I have been given only 88 minutes.
The passing score is 75% which means you will have to answer at least 38 questions correctly.

The  questions asked in the exam are of the type "multiple choices". You will be asked to select one of more answer from a list of four or five.


 STUDY MATERIAL

Today, there is a lot of material on the Internet regarding Spring. Sometimes it can even be overwhelming. If you want to stick only with material you need specifically to pass the certification exam, the most important resource it is already under your hands; The Spring Guide you have been given during the course it is a good starting point for preparing this exam.
Another resource I found extremely useful and very loyal with the exam topics, is the Spring in Action book:


Jeanne Boyarsky also published a very useful study guide.

Other very useful resources are reported on the mock exams website I used, where you also find all the links to the Spring DOC!


PREPARATION


This is probably the most important section of all. I will try to go point by point through the preparation plan I fellow:

  • Start with the Spring Study guide you have been given at the course! Go through it, section by section, topic by topic. If you feel the material regarding a specific topic is too limited or not understandable, check it out on the Spring official documentation;
  • Go through all the labs you have been given on the usb drive. You will be also given an associated documentation with detailed or less detailed instructions on how to perform the labs. Try to avoid using it, and use only the TODO list that will appear in your IDE. Going through the labs, might be particular useful to consult the official Spring API documentation.
  • For the "security" topic, slides might not be enough. I would suggest you to read the Spring Security official documentation and the Spring Security API documentation.
  • At this stage you should already have a very solid knowledge of each topic present in the exam, so I would suggest you to try to take a mock exam. Mock exams are high fidelity simulation of the real exam. They are particularly useful when you want to spot your weak points and if you are ready to book the exam. I will talk about mock exams in the next section.
  • At this stage you should carefully analyse your mock exam results. If you have already scored high, you are in a very good shape and you might want to try to take the other mock exams available until you feel totally confident. If you didn't score high, you should take note of your weak points. This time, instead of going back on the study guide, I would suggest to consult the Spring in Action book. Remember that this book comes with some code examples. You want to take a look at them. They can be download for free.
  • When you feel confident, you can book the exam. I will explain later how to do it.

MOCK EXAMS

People are always debating whether mock exams should be part of the preparation or not. Personally I find mock exams extremely useful. There is no harm in performing some simulation before the real exam ! Also they can save you money and time.
In first instance, under Jeanne Boyarsky suggestions, I have tried the mock exams on www.skill-guru.com. There are a couple of mock exams you can buy for 10 dollars each (20 dollars in total), but with the first one, I got stuck at 16th question and I couldn't surf the test anymore (I have a mac and my browser is Chrome). The second one had the same issue around the 30th question.
Therefore, I tried www.springmockexams.com. Their website is packed with all the information you need for taking the certification, and the mock exams (I think you have four or five mock exams available) resulted to be very loyal with the real exam. The only difference is that they are slightly more complex than the real exam; I scored 76%-73%-80%-82% in each mock exams but I finally scored 94% on the real exam. If you score high with these mock exam, I'd say you can be quite confident you will pass the exam. The best characteristic of these mock exams is that there have very very satisfying explanations at the end of each question. I learnt more form their explanations than from the study guide, on the exam point of view. They also have a free version with 10 questions.. I think I paid 19.99 dollars for the full version. Great investment !

HOW TO BOOK THE EXAM


It is now time to book the exam; The exam is run at Pearson Vue center. For booking the exam, you have to connect to www.pearsonvue.com.


First thing to do is to register on the website if you haven't done it already for other certification.  Then you will be asked to choose the exam you want to take and locate a test center.. I have chosen New Horizon:


Once you're done, you will have insert your voucher code and you will receive and email with the confirmation of the booking. You won't need to bring anything relating the exam with you. Everything is already automatically set. 
Follow the instruction in the e-mail and go to the center chosen half hour before the exam. You will need to provide to two form of identification and compile a module with some personal information. Also a photo of you will be taken. If you pass the exam the photo it is supposed to appear on your Vmware profile on-line!
It never shown up for me though until now.


THE EXAM - AMBIGUOS QUESTIONS

At the exam you will be given a pen and a couple of paper sheets you will have to return at the end. The room is under video surveillance so do not try to cheat, really!
Regarding the exam itself, if you have taken the mock exams in advance, there will really be nothing new. 
The only thing I want to highlight is that I've got a couple of ambiguous question. One regarding AOP and one regarding the container. I don't know if I can report the question as it was on the exam; 
The one on the container for example, was something like this:

Select the snippet that return a bean of the class "xxx";
The alternative were like:

  1. (Xxx) context.getBean ("xxx")
  2. context.getBean (''Xxx")
  3. context.getBean("Xxx.class")
  4. None of the above.

I answer 4, none of the above, simply because while it is true that the answer 1 and 3 will return a bean of the class Xxx, it is also true that the Application context might contain more than one bean of the class Xxx. In this case, any of the method call in 1 and 3 would fail with an exception at runtime: No unique bean of type [Xxx] is defined: expected single bean but found 2. Thus, because in a certification exam I assume nothing, I answered number 4 and I think it has been marked as a wrong answer. So be careful to this kind of questions. They can be very tricky.


AFTER THE EXAM


When you finish the exam, the score will be provided immediately. You will also receive a breakdown of your score grouped by topics. Those moments.... ah those moments :)

     
THE CERTIFICATION


If you passed the exam, and you want a soft copy of the certificate, you will have to ask it on the vmware website. Not sure why this process is not automatic yet.  This is mine:


There won't be any hard copy unfortunatly.
I hope this helps !!!


STAY CERTIFICATED !

LUCA